更多>>关于我们
 西安鲲之鹏网络信息技术有限公司从2010年开始专注于Web(网站)数据抓取领域。致力于为广大中国客户提供准确、快捷的数据采集相关服务。我们采用分布式系统架构,日采集网页数千万。我们拥有海量稳定高匿HTTP代理IP地址池,可以有效获取互联网任何公开可见信息。
 您只需告诉我们您想抓取的网站是什么,您感兴趣的字段有哪些,你需要的数据是哪种格式,我们将为您做所有的工作,最后把数据(或程序)交付给你。
 数据的格式可以是CSV、JSON、XML、ACCESS、SQLITE、MSSQL、MYSQL等等。
更多>>技术文章
发布时间:2024-06-06 来源:西安鲲之鹏官微
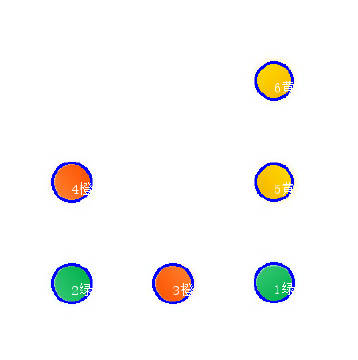
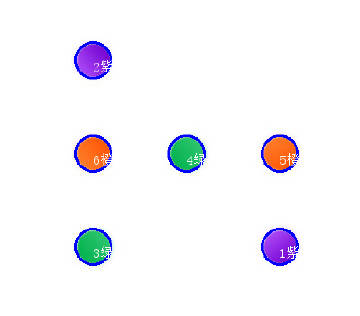
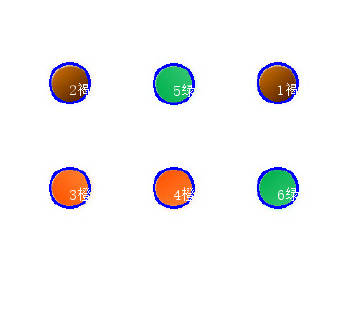
【经验分享】基于openvc的轮廓及颜色检测,效果如附图所示
import cv2
from PIL import Image, ImageDraw, ImageFont
def get_hsv_color_name(h, s, v):
"""根据HSV值返回颜色名称
"""
HSV_COLORS = [{'name': '黑', 'h': (0, 180), 's': (0, 255), 'v': (0, 46)},
{'name': '灰', 'h': (0, 180), 's': (0, 43), 'v': (46, 220)},
{'name': '白', 'h': (0, 180), 's': (0, 30), 'v': (221, 255)},
{'name': '红', 'h': (0, 10), 's': (43, 255), 'v': (46, 255)},
{'name': '橙', 'h': (11, 13), 's': (43, 255), 'v': (46, 255)},
{'name': '褐', 'h': (14, 23), 's': (43, 255), 'v': (46, 255)},
{'name': '黄', 'h': (24, 34), 's': (43, 255), 'v': (46, 255)},
{'name': '绿', 'h': (35, 77), 's': (43, 255), 'v': (46, 255)},
{'name': '青', 'h': (78, 99), 's': (43, 255), 'v': (46, 255)},
{'name': '蓝', 'h': (100, 124), 's': (43, 255), 'v': (46, 255)},
{'name': '紫', 'h': (125, 155), 's': (43, 255), 'v': (46, 255)},
{'name': '红', 'h': (156, 180), 's': (43, 255), 'v': (46, 255)}]
for color in HSV_COLORS:
if h >= color['h'][0] and h <= color['h'][1] and \
s >= color['s'][0] and s <= color['s'][1] and \
v >= color['v'][0] and v <= color['v'][1]:
return color['name']
def cv2AddChineseText(img, text, position, textColor, textSize):
"""添加中文文本
"""
img = Image.fromarray(cv2.cvtColor(img, cv2.COLOR_BGR2RGB))
draw = ImageDraw.Draw(img)
fontStyle = ImageFont.truetype("simsun.ttc", textSize, encoding="utf-8")
# 绘制文本
draw.text(position, text, textColor, font=fontStyle)
# 转换回OpenCV格式
return cv2.cvtColor(np.asarray(img), cv2.COLOR_RGB2BGR)
def find_color_circles(image_path):
"""标注各圆形的轮廓和颜色
"""
print('image_path: {}'.format(image_path))
image_origial = cv2.imread(image_path)
# 转灰度图
image_gray = cv2.cvtColor(image_origial, cv2.COLOR_BGR2GRAY)
# 转HSV颜色空间,后面获取点的颜色名称时用
image_hsv = cv2.cvtColor(image_origial, cv2. COLOR_BGR2HSV)
# 二值化
_, image_binary = cv2.threshold(image_gray, 210, 255, cv2.THRESH_BINARY)
# cv2.imshow('image_binary', image_binary)
# cv2.waitKey(0)
# 寻找轮廓
contours, _ = cv2.findContours(image_binary, cv2.RETR_LIST, cv2.CHAIN_APPROX_NONE)
print('Size of contours:', len(contours))
# 按面积从大到小排序所有轮廓
sorted_contours = sorted(contours, key=cv2.contourArea, reverse=True)
# 遍历所有轮廓,跳过最外面的大矩形轮廓
for i in range(1, len(sorted_contours)):
print('#' * 100)
print('Index:', i)
# 轮廓面积
area = cv2.contourArea(sorted_contours[i])
print('Area:', area)
# 轮廓周长
arclen = cv2.arcLength(sorted_contours[i], True)
print('Arclen:', arclen)
# 在原图上画出轮廓
#cv2.drawContours(image_origial, [sorted_contours[i]], -1, (255, 0, 0), 2)
# 构造一个对象的面积最小包围圆形
(x, y), radius = cv2.minEnclosingCircle(sorted_contours[i])
# 圆心
center = (int(x) , int(y))
print('Center:', center)
# 半径
radius = int(radius)
print('Radius:', radius)
if radius < 10:
print('This circle is too small, skit it.')
continue
# 画出这个圆
cv2.circle(image_origial, center, radius, (255, 0, 0) , 2)
# 获取圆心的hsv颜色
h, s, v = [], [], []
for xo in range(-10, 11):
for yo in range(-10, 11):
_h, _s, _v = image_hsv[int(y), int(x)]
h.append(_h)
s.append(_s)
v.append(_v)
h = sum(h)/len(h)
s = sum(s)/len(s)
v = sum(v)/len(v)
print('HSV:', h, s, v)
# 获取hsv颜色对应的名称
color_name = get_hsv_color_name(h, s, v)
print('Color name:', color_name)
# 标出颜色名称
# 直接使用cv2.putText()中文会乱码
#cv2.putText(image_origial, color_name, (int(x), int(y)), cv2.FONT_HERSHEY_SIMPLEX, 0.5, (255, 255, 255), 2)
image_origial = cv2AddChineseText(image_origial, str(i) + color_name, (int(x), int(y)), (255, 255, 255), 15)
#cv2.imshow('Show{}'.format(i), image_origial)
cv2.imwrite(image_path.replace('.png', '_marked.png'), image_origial)
cv2.imshow('Show-{}'.format(os.path.basename(image_path)), image_origial)
cv2.waitKey(0)
cv2.destroyAllWindows()
特别说明:该文章为鲲鹏数据原创内容 ,您除了可以发表评论外,还可以转载到别的网站,但是请保留源地址,谢谢!!(尊重他人劳动,我们共同努力)
☹ Disqus被Qiang了,之前的评论内容都没了。如果您有爬虫相关技术方面的问题,欢迎发到我们的问答平台:http://spider.site-digger.com/


