更多>>关于我们

西安鲲之鹏网络信息技术有限公司从2010年开始专注于Web(网站)数据抓取领域。致力于为广大中国客户提供准确、快捷的数据采集相关服务。我们采用分布式系统架构,日采集网页数千万。我们拥有海量稳定高匿HTTP代理IP地址池,可以有效获取互联网任何公开可见信息。

您只需告诉我们您想抓取的网站是什么,您感兴趣的字段有哪些,你需要的数据是哪种格式,我们将为您做所有的工作,最后把数据(或程序)交付给你。

数据的格式可以是CSV、JSON、XML、ACCESS、SQLITE、MSSQL、MYSQL等等。

更多>>官方微博

西安鲲之鹏
陕西 西安

加关注

  • 【经验分享】未解锁BL的手机进9008模式(Mi6X为例)

    对于未解锁BL的手机,需要拆机,通过短接特定触点的方式进入9008模式。
    以小米Mi6X为例:
    第一步,拧掉充电口旁边的两颗螺丝。
    第二步,扣开后盖,可能不太好扣,可以借助美工刀在边缘撬一下。拧掉保护条上的3个螺丝。
    第三步,拔掉电池排线。看图,记着两个短接触点的位置。
    第四步,用镊子短接两个触点,同时插入TypeC线,2秒左右设备管理器"端口COM"里会出现9008接口,此时松开镊子。
    发布时间:2024-11-27 10:13:20
  • 【经验分享】已解锁BL的手机进9008模式

    高通9008模式全称"Qualcomm HS-USB QDLoader 9008",它相对于recovery、fastboot和Android系统是独立的。即深刷模式,也叫EDL,号称"救砖神奇"。

    对于已解锁BL的手机,进入9008相对比较简单,以小米Mi6X为例:
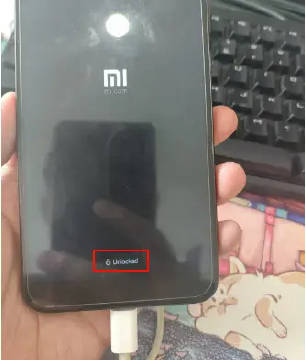
    1. 先确定手机是否解锁BL了。已解锁BL的手机,刚开机的时候会有"Unlocked"字样,如附图1所示。
    2. 长按“音量减键 + 开机键”进入fastboot。
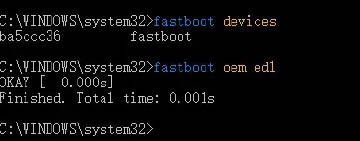
    3. 执行fastboot oem edl,即可进入9008模式,进入成功后设备管理器COM端口里可以看到"Qualcomm HS-USB QDLoader 9008"。如附图2、3所示。
    发布时间:2024-11-26 12:53:03
  • 【经验分享】com.android.org.conscrypt.TrustManagerImpl证书固定检测绕过示例

    某APP使用通用的sslunpinning脚本后仍然抓不到包:
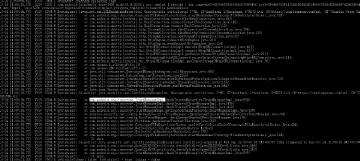
    (1)分析logcat日志,发现com.android.org.conscrypt.TrustManagerImpl类相关代码抛出java.security.cert.CertificateException异常,如图1所示。
    (2)hook 类com.android.org.conscrypt.TrustManagerImpl的checkTrusted和checkServerTrusted方法,返回空列表,成功抓到包。

    日志线索寻找关键词:CertificateException、CertificateExpiredExceptio、SSLHandshakeException
    发布时间:2024-10-24 15:36:45
  • 【经验分享】如何获取安卓手机上已安装APP的安装包(.apk)文件?

    1. 先查看已安装APP列表,确定对应APP的包名。
    adb shell pm list packages
    2. 假设包名为org.gushiwen.gushiwen。再根据包名查看APP的详细信息:
    adb shell dumpsys package org.gushiwen.gushiwen
    返回信息中的path属性,以base.apk结尾的,即就是这个APP的安装文件,如附图1所示。另外返回的信息中还有当前APP的版本(versionName属性),如附图2所示。
    3. pull下来这个文件,就可以在其它设备上安装了。
    发布时间:2024-10-22 11:27:51
  • 【经验分享】Dell R720意外断电重启之后丢失硬盘(硬盘状态变为Foreign)问题解决?

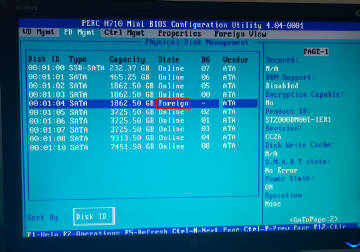
    本来有10块盘,启动的时候显示只有9块Virtual Disk。“Ctrl + R”进入RAID设置,在“VD Mgmt”标签页下也只看到了9块Virtual Disk。在“PD Mgmt”标签页下看到是有10块物理盘,不过第5块状态变成“Foreign”了(如附图1所示)。

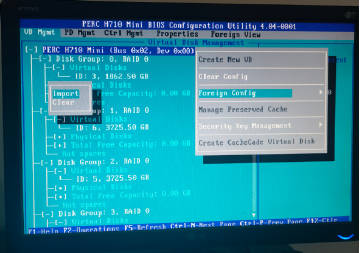
    解决方法:在“VD Mgmt”标签页下,焦点切换到"PERC H710 Mini"上按F2,然后"Foreign Config",再然后"Import",操作完成(要等待几秒)之后就能看到全部盘了,如图2所示。

    PS:用Ctrl + N快捷键切换菜单标签。
    发布时间:2024-10-18 16:35:44
  • 【经验分享】一个游戏闯关模式学习CSS Selector的网站"CSS Diner":https://flukeout.github.io/
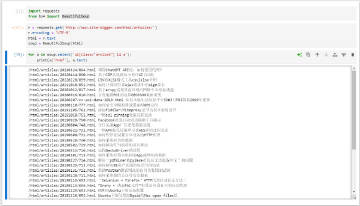
    Python使用BeautifulSoup实现CSS Selector解析HTML文档的示例:

    import requests
    from bs4 import BeautifulSoup

    r = requests.get('http://www.site-digger.com/html/articles/')
    r.encoding = 'UTF-8'
    html = r.text
    soup = BeautifulSoup(html)
    for a in soup.select('ul[class="arclist"] li a'):
    print(a['href'], a.text)
    发布时间:2024-09-02 19:43:03
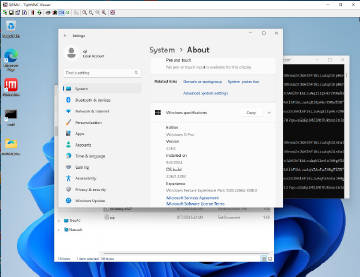
  • 【经验分享】qemu-system-x86运行tiny11
    (1) 安装qemu-system-x86,安装完成后无需重启。
    sudo apt-get update
    sudo apt-get install qemu qemu-utils qemu-system-x86
    (2) 创建硬盘。
    qemu-img create -f qcow2 tiny11.img 50G
    (3) 创建虚拟机。
    sudo qemu-system-x86_64 --enable-kvm -m 2G -smp 4 -boot order=dc -hda /home/qi/kvm/tiny11-1/tiny11.img -cdrom /home/qi/kvm/tiny11_23H2_x64.iso -vnc :1
    (4) vnc连接 "服务器ip:5901",完成系统安装过程。设置vnc密码的方法:https://qemu-project.gitlab.io/qemu/system/vnc-security.html#with-passwords
    (5) 映射主机端口给虚拟机,使用-redir参数。如下示例,将主机的TCP/UDP4001端口映射到虚拟机的4000端口。
    -redir tcp:4001::4000 -redir udp:4001::4000
    发布时间:2024-08-10 12:13:46
  • 【经验分享】Playwright过geo.captcha-delivery.com检测

    page.add_init_script('''Object.defineProperties(navigator, {webdriver:{get:()=>undefined}}); delete navigator.__proto__.webdriver;''') ​​​
    发布时间:2024-07-31 10:41:18
  • 【经验分享】scrcpy在网络质量欠佳环境下可以通过降低码率来提高流畅度
    e.g.
    scrcpy --bit-rate 1M --max-fps 5
    注意:在新版本中--bit-rate参数更名为--video-bit-rate ​​​
    发布时间:2024-07-03 10:11:54
  • 【经验分享】scrcpy在小米手机上鼠标不起作用问题的解决

    在“开发者选项”中需要打开"USB调试(安全设置) - 允许通过USB调试修改权限或模拟点击"。要打开这个选项,手机需要先登录小米账号,另外手机必须要插有SIM卡。 ​​​
    发布时间:2024-07-03 10:09:29
当前位置: 首页 > 技术文章 >
陕西移动网上营业厅验证码识别方案
发布时间:2011-06-08

// 转载请注明出处  鲲鹏数据 http://www.site-digger.com


陕西移动网厅:http://www.sn.10086.cn/

验证码生成链接:https://sn.ac.10086.cn/SSO/servlet/CreateImage

验证码示例:

该验证码较为简单:内容为四位纯数字(0-9),单个字符宽度固定,字符垂直位置固定,背景有很少的杂色。


识别方案:

1)提取特征库。

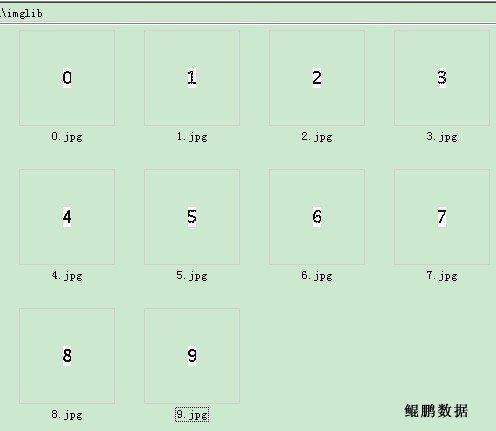
下载足够多的验证码图片(至少包含0-9所有数字)。截取每个数字(8×20像素矩阵)单独存储作为特征库。

实现方法如下(用到了Python的PIL库):

  1. import Image  
  2.   
  3. def make_lib():  
  4.     img = Image.open('code.jpg')  
  5.     gray_img = img.convert('1')   
  6.     gray_img.save('gray.jpg')  
  7.       
  8.     width, height = gray_img.size  
  9.       
  10.     # find each number  
  11.     w = 0  
  12.     while w < width:  
  13.         column = []  
  14.         for h in range(height):  
  15.             column.append(gray_img.getpixel((w, h)))  
  16.   
  17.         # begining of a number  
  18.         if sum(column)/height < 245:  
  19.             box = (w, 0, w+820)  
  20.             region = gray_img.crop(box)  
  21.             region.save('%s.jpg' % w)  
  22.             w = w + 10  
  23.         else:  
  24.             w = w + 1  
注:img.convert('1')作用是将彩色图二值化(只有0和255两种像素值)。
 
原理?
按列扫描,依次找到每个数字的起始位置,截取宽度为8像素,高度为20像素的区域保存。
 
如何识别字符的开始位置?
测试发现,列像素之合小于245的是有数字的部分。
 
最终建立如下特征库:
 
2) 匹配方案。
 
按列扫描,依次找到每个数字的起始位置,获取宽度为8像素,高度为20像素的矩阵A。
拿矩阵A一次跟特征库矩阵进行对比,以差值数(详见下面Captcha类中的_cmpmatrix方法)最小的特征字符为匹配字符。
 
下面给出我们实现的Captcha类。
  1. # coding: utf-8  
  2. # captcha.py  
  3. # http://www.site-digger.com  
  4. # hello@site-digger.com  
  5. # Identify captcha on http://www.sn.10086.cn/  
  6.   
  7. import Image  
  8.   
  9. class Captcha:  
  10.     def __init__(self):  
  11.         self.imglib = {}  
  12.         self._loadlib()  
  13.       
  14.     def _loadlib(self):  
  15.         """Load characteristic image lib"""  
  16.           
  17.         import os  
  18.         if not os.path.exists('imglib'):  
  19.             print 'Can not find imglib dir.'  
  20.             return  
  21.           
  22.         for i in range(10):  
  23.             self.imglib[i] = []  
  24.             img = Image.open('imglib/%d.jpg' % i).convert('1')  
  25.             width, height = img.size  
  26.             for w in range(width):  
  27.                 # store all pixels in a column  
  28.                 column = []  
  29.                 for h in range(height):  
  30.                     column.append(img.getpixel((w, h)))  
  31.                 self.imglib[i].append(column)  
  32.           
  33.     def _cmpmatrix(self, listA, listB):  
  34.         """Return the count of difference between two list"""  
  35.           
  36.         if len(listA) != len(listB): return  
  37.           
  38.         num = 0  
  39.         for i, column in enumerate(listA):  
  40.             if len(column) != len(listB[i]): return  
  41.             for j, pixel in enumerate(column):  
  42.                 if pixel != listB[i][j]:  
  43.                     num += 1  
  44.         return num  
  45.       
  46.     def _whichnum(self, piexls_matrix):  
  47.         """Identify single number"""  
  48.   
  49.         minnum = None  
  50.         index = 0  
  51.         for i in range(10):  
  52.             ret = self._cmpmatrix(self.imglib.get(i, []), piexls_matrix)  
  53.             if ret!= None:  
  54.                 if minnum == None or minnum > ret:  
  55.                     minnum = ret  
  56.                     index = i  
  57.     
  58.         if minnum != None:  
  59.             return str(index)  
  60.         else:  
  61.             return '?'  
  62.       
  63.     def identify(self, filepath=None, fileobj=None):  
  64.         """Identify captcha"""  
  65.   
  66.         if filepath:  
  67.             img = Image.open(filepath)  
  68.         elif fileobj:  
  69.             img = Image.open(fileobj)  
  70.         else:  
  71.             print 'Invalid input.'  
  72.             return  
  73.           
  74.         img = img.convert('1')  
  75.           
  76.         width, height = img.size  
  77.           
  78.         w = 0  
  79.         number = ''  
  80.         while w < width:  
  81.             column = []  
  82.             for h in range(height):  
  83.                 column.append(img.getpixel((w, h)))  
  84.   
  85.             # begining of a number  
  86.             if sum(column)/height < 245:  
  87.                 piexls_matrix = []  
  88.                 for i in range(8):  
  89.                     piexls_column = []  
  90.                     for j in range(20):  
  91.                         piexls_column.append(img.getpixel((w + i, j)))  
  92.                     piexls_matrix.append(piexls_column)  
  93.                       
  94.                 number += self._whichnum(piexls_matrix)  
  95.                 w = w + 10  
  96.             else:  
  97.                 w = w + 1  
  98.   
  99.         return number  
  100.          
  101. if __name__ == '__main__':  
  102.     """Test performance of Captcha Class"""  
  103.     captcha = Captcha()  
  104.   
  105.     try:  
  106.         import urllib2  
  107.         response = urllib2.urlopen('https://sn.ac.10086.cn/SSO/servlet/CreateImage')  
  108.         open('code.jpg''wb').write(response.read())  
  109.         Image.open('code.jpg').show()  
  110.         print captcha.identify('code.jpg')  
  111.     except Exception, e:  
  112.         print 'Download captcha fail.', e  
 
 
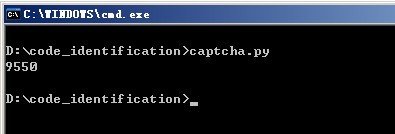
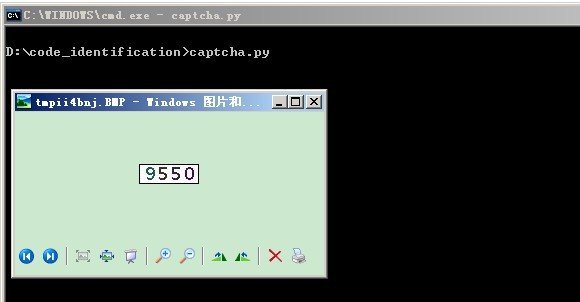
测试用例说明: 动态下载陕西移动网厅的验证码,首先显示,然后调用Captcha类对其进行识别、打印。效果如下图所示。


特别说明:本文旨在技术交流,请勿将涉及的技术用于非法用途,否则一切后果自负。如果您觉得我们侵犯了您的合法权益,请联系我们予以处理。
☹ Disqus被Qiang了,之前所有的评论内容都看不到了。如果您有爬虫相关技术方面的问题,欢迎发到我们的问答平台:http://spider.site-digger.com/